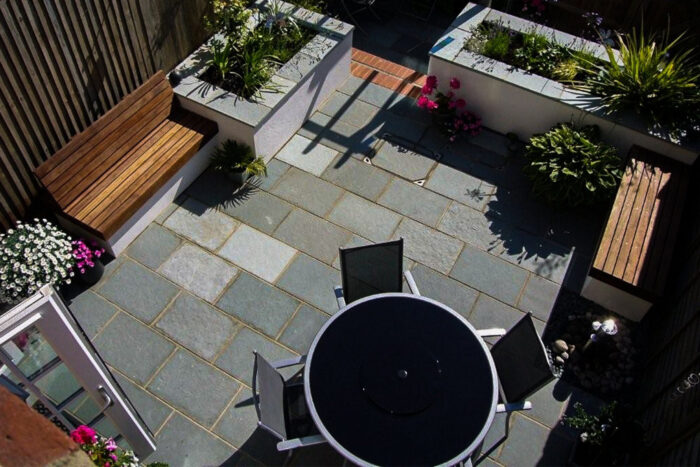
How to lay paving slabs is probably one of the most common pieces of advice we’re asked for. And that’s not surprising, as it’s also one of the easiest ways to enhance an outdoor space and that doesn’t necessarily need specialist tools or expertise. After all, it’s just a little digging, mixing, and laying down slabs…right?!
Whilst we absolutely believe it is something you can do yourself – a bit of expertise and helpful advice goes a long way. You need to know what you’re doing when it comes to preparing your sub-base and mixing your mortar with the right quantities of the right materials. And a paver in the wrong place, or without the right aspects for drainage taken into consideration, could turn your project into a nightmare pretty quickly.
That’s why we’ve put together this guide on how to lay paving slabs, with all the information you’ll need in one place. We’ll walk you through the process, which will not only hopefully help you save a few £s, but also enable you to prepare and have everything to hand before you begin your project.
What You’ll Need
- MOT Type 1 (sub-base)
- Cement
- Garden broom/hard-bristled brush
- Garden rake
- Paving slabs of choice
- Pointing Trowel
- Quality paving slabs
- Rubber Mallet
- Sharp sand
- Shovel
- Spirit Level
- String Line
- Tamper
- Tarpaulin (optional, but useful)
- Wheelbarrow
- Wooden pegs
Before You Begin
We would recommend dry laying your patio first. Set out your slabs in your intended design so you can see how things will look when finished. This is your opportunity to make any small tweaks, check size, and even that you have enough slabs.
It’s important that you wear the appropriate safety gear throughout your project. For instance, wet mortar has the potential to burn exposed skin, so wearing suitable protective gloves and longer sleeves is recommended. And even at this stage, padding and gloves will prevent scratches, cuts, and bruises as you move your slabs around.
Laying The Foundation
This is the most important part of your project. Getting this bit right will ensure you have a pristine canvas for your paving project. You’ll be measuring, digging, and tamping an area so that it’s perfect for landscaping on.
Start by measuring out your intended paving area and marking it clearly with your wooden pegs. Then, it’s the hard work of clearing the ground of topsoil, vegetation, roots etc. in the marked-out area.
You should allow a depth of between 150-200mm for your foundation. And if you are laying your patio directly next to a building, then your foundation will need to be at least 150mm below the damp proof course, which means digging out the area to a minimum depth of 300mm below this.
To ensure water does not collect on your paving, the foundation also needs to have a fall of 1 in 80. That means allowing a one-centimetre fall for every 80cm of width. In example, a four-metre patio will need a five-centimetre fall (50mm).
Rake the surface level and then compact the entire area using the tamper. Double-check everything is on track as you go using the spirit level. Then, you’ll be filling your patio space with 150mm of sub-base – typically an MOT Type 1, before compacting it down to 100mm. The good news? All your groundwork prep is now completed!
Mortar Preparation
For most applications, a 10:1 ratio mix of sharp sand to cement should work – especially for light pathways and patios. However, there won’t be any harm in increasing the ratio of your mortar mix up to six parts sharp sand to one part cement (6:1). Aim to add small amounts of water to make it damp and workable as you go – wet and runny mortar isn’t going to do you any favours. You can then lay your paving slabs on a full mortar bed that supports the whole slab – not just at the corners.
Laying the Paving
Now, all it’s time to lay the paving. And your first job will be setting up two taut string lines to guide both the line and level of your slabs. The first line should run down the entire length of the patio, and the second from side to side. Only one of these will include the fall for drainage, dependent on the lay of the land.
Once you start laying your slabs, it’s good practice to start from a corner and work your way out from there. Spread your mortar to cover an area slightly larger than the slab you want to lay, and high enough to enable you to tap it down to the right level. You’ll need to take care as you lift and lower the slab into place, to make sure you don’t catch the corners. Remember to mix a fresh bed of mortar for each slab – otherwise it will dry out before you can lay the whole patio. Do this in the wheelbarrow, so you can work as you go.
Using the rubber mallet, start to tap the slab into place. You can hit the paver quite firmly without risking breakage, but don’t go mad! You should aim to place your blows at the points roughly midway between the corners of each slab and its centre, along an invisible diagonal from each corner. Move around the paving, tapping in succession until the slab settles at the correct level.
Check each slab with a spirit level to ensure it has been laid correctly, remembering to incorporate the fall for drainage as we previously detailed. Continue to lay your slabs in this manner. You’ll also need to remember to leave gaps for jointing – and this will be anything from 5 to 15mm, depending on the paver you’ve selected. If in doubt, check the product recommendations.
Once completely laid, your patio should be left for anything between 24-48 hours. If you’re worried about rain (this is good old England after all), this is where the tarpaulin could be useful. And unfortunately, it does mean you’ll need to resist the urge to walk on your newly finished creation. But it will enable the bedding mortar to harden, and then you can enjoy it for years to come!
Jointing and Finishing Touches
Once you’ve allowed the paving slabs to set, and the mortar to harden, you can fill the gaps between your pavers with the jointing compound. This will bind the stonework.
Your mortar mix for jointing will be made of three parts soft building sand to one part cement. Mix it slowly, adding a little water at a time until you get a smooth, damp consistency. You could also consider adding a plasticiser at this stage to make the mortar easier to work with as you go.
Using the pointed trowel, apply the mortar into the joints, ensuring to press it down and smoothing over each time. Take your time as you do this – you want to avoid any mortar ending up on the surface of the paving slabs. However, if some surplus mortar does end up where it doesn’t belong, don’t panic. Just wait a few hours until it has begun to harden, and you’ll find it much easier to remove.
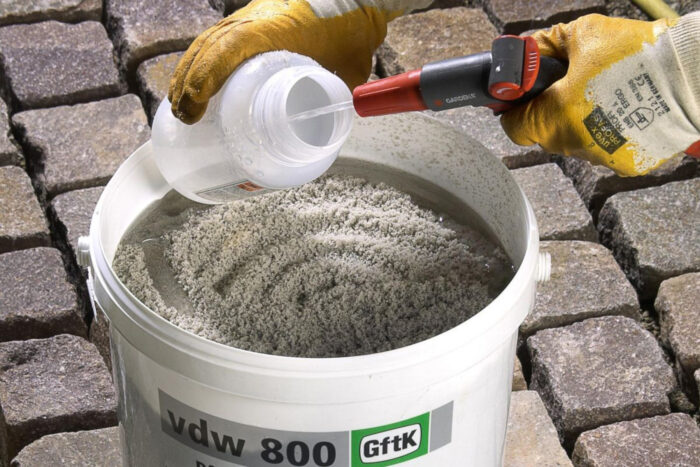
Alternatively, you can also use resin-based slurries and grouts, such as Joint-It and Easy Joint. Once prepared, in a similar way to above, these can be brushed in with water and a broom. Both these products are ready to go. However, for areas where joints are wider than 5mm, the more heavy-duty VDW can be used.
Once the mortar has hardened, all that’s left to do is tidy things up – sweep things down with the broom and you now have a brilliant new patio you’ll be able to enjoy for years, whatever the weather.
Summary
The four most important tips in our guide on how to lay paving slabs are:
- Always dry lay the patio first to ensure measurements are correct and you have enough materials
- Create a good, solid foundation and double check the depths. Measure twice, lay once – to paraphrase the familiar advice we all know!
- Start laying the patio a corner and work outwards
- Check your levels and required fall as you work to ensure you stay on track
As always, the Corker team are on hand to guide you through the right products and processes for any landscaping job you have in mind. Why not pop down to our fantastic show gardens to get some inspiration for your new, ready for 2022, outdoor space. And if it’s a job you’d rather leave to the professionals, we can recommend the right local specialist. Get in touch today to find out more.
